Monday, July 3, 2017

An Abundance of Plums

Before we get into it I have a few life updates since the last time I posted:
1) I have slowly been decorating my balcony. My Aunt and Uncle gave me a gorgeous teal bistro set a few weeks ago and it inspired me to decorate with bright colors. I found a sunflower plant that, in the week since I got it, hasn't died yet so I'll put that in the win column. On Friday I went to a hardware store to get some ceiling fans and noticed the perfect purple planters to add. on my way home I stopped by a nursery and filled them up! One has purple, pink, and white flowers, one has herbs (oregano, basil, thyme, sage, and curry), and the last one has tomato plants. Ideally I would have loved to have a vegetable garden but I am limited when it comes to space and for now this will have to do. I do have a reputation for killing plants, but I will not give up!


and more importantly:
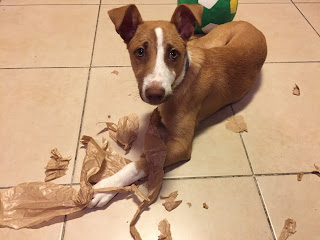
2) I ADOPTED A PUPPY!


His name is Chance and he's perfect. I adopted him about two months ago and while having a puppy is certainly not easy I am so happy that he's in my life! I've wanted to adopt a dog for a while but decided to wait until I was living without room mates to get one.


When I got back from my brother's wedding in California I started looking. Chance (known then as Ace) popped up on an adoption group's Facebook page and that was it! I went to meet him in Tel Aviv where he was staying with a foster mom and the next day I signed the adoption papers.


He was around four months old when I got him. Oh, he also has only three legs. He was born missing his front right leg but that doesn't stop him from anything! It's been so inspiring to see how he doesn't let anything get in his way.

Hey girl, hey!
He runs, jumps, and plays just like any other dog. He may take a few more spills than other dogs, but he always gets right back up and keeps going.

Chilling while I work

He's very special and even though I've only had him for about two months, I couldn't imagine life without him.
Licking his favorite toy in his sleep

Okay, now on to the baked goods.


Yes friends, summer has arrived and how! It has been SWELTERING here. Summer brings some of my favorite fruits, stone fruit! I had a VERY busy Friday, but running around actually provided me with an opportunity I haven't had before, going to a fruit and vegetable shop on Friday afternoon when they slash their prices! That is how I ended up with a box full of plums for under twenty shekels.


While I love to eat plums by themselves there is no way I can go through an entire box before they go bad, and so I turned to the internet. My friend Chana suggested plum bars and after a quick search on Pinterest I found a great recipe that I already had all the ingredients for. If you have all the tools these are very easy to make. One thing that I did not enjoy was cutting up the plums.


With peaches and nectarines it's easy to make all the slices while the fruit is still whole and then pull off the pieces. This is not the case for plums and I found out the hard way. The first two plums did end up a bit of a sticky messy but that doesn't matter because they are being baked. I did get the hang of it and the rest of the plums ended up a bit prettier.


While they are called breakfast bars these are too sweet for me for breakfast so I'll be taking them in to work to share.


Plum Breakfast Bars (taken from Clever Housewife)

Crust and Topping
¾ cup melted butter
½ cup chopped nuts (almonds, walnuts or pecans)
1¼ cup flour
1 cup brown sugar
1¼ cup rolled oats
1/2 tsp salt
½ tsp baking powder
½ tsp baking soda

Plum Filling
2 cups diced plums
1/2 cup sugar
½ tsp cinnamon
2 Tbs flour
2 Tbs butter, melted and cooled
1 Tbs lemon juice

Instructions
  1. Preheat oven to 350
  2. In food processor, whirl all the crust dry ingredients, including nuts til fine crumbs, then add melted butter and whirl until crumbly and clings together.
  3. Reserve about 1 1/2 cups of the crumb mixture and set aside.
  4. Press remaining crumb mixture in to 9 x 13 baking dish.
  5. Bake for 12 - 15 min until edges just begin to brown. Remove from oven and let cool for a few minutes.
  6. Prepare plums while crust is baking, then toss with sugar, cinnamon, flour, lemon juice and melted butter.
  7. Spread over crust, and then crumble reserved crumb mixture evenly over the top.
  8. Bake at 350 for 35 - 40 min, until brown. Let cool, then cut into bars or squares.

Tuesday, March 14, 2017

Caramel Apple Pie Hamantaschen for Pi Day!!!

Today is Pi Day!!! Well, in Israel it technically isn't because we put the day before the month, so it is 14.3, not 3.14, but why ruin the fun? Pi Day also just so happens to be my birthday and this year is a big one - 30. Honestly 30 doesn't feel any different than 29 and 364 days. This past year has been a great one - I love my job, bought an apartment, and after 11 years finally live without room mates. None of my former room mates reading this should take that as a slight, I love you all, but living on my own has always been a dream and goal of mine and now it has finally happened.

Now about a week and a half ago I made a pledge to make 7 hamantaschen for Purim and while I did make a million hamantaschen, I fell behind a bit. I managed to make 5 different kinds before Purim (one of which I haven't posted yet) and I thought "Maybe I'll just leave it at 5." But then the day after Purim I remembered that even if I didn't manage to make them all before Purim doesn't mean I can't follow through and finish them. Pi Day offers a unique opportunity to combine pie and hamantaschen and thus I present:

Day 5: Caramel Apple Pie Hamantaschen


These ones were pretty labor intensive. I made dulce de leche from scratch, using condensed milk, and also made an apple pie filling from scratch. Add that to the fact that I basically had no time and I was pretty busy. I've seen plenty of recipes where you make dulce de leche from a can of condensed milk. The easiest way is by putting it in a pot of water and boiling it for 3 hours. It may be easy but this freaks the hell out of me because every recipe I saw had in bold MAKE SURE THE CAN IS ALWAYS COVERED BY THE WATER. This is because if the water level goes below the top of the can it can explode. Yeah, definitely not doing that. My experience with things possibly exploding or breaking always ends with things exploding or breaking so I had to find another way. I ended up going with a double boiler. It took quite some time, about 3 hours, but there was no risk of explosion or injury to myself or my brand new apartment. Also let me tell you, this stuff is liquid gold! It tastes so good! Now I need to go find more recipes that use it so that I have an excuse to make it again...

Look at all that golden goodness
I used Tori Avey's recipe for the apple filling and the hamantaschen. The apple filling also took some time to make. I needed to peel, grate and boil four apples with some water and sugar. This filled my house with some of the best smells. 

It almost looks like spaghetti
Once I had everything made, including the dough, I threw it all in the fridge to chill and made them the next morning. 

Look at that beautiful morning light peeking through the blinds
This morning I had plans to have brunch with my friend Racheli at Cafe Shalva in honor of my birthday. Cafe Shalva is a cafe at the Shalva Children's Center in Jerusalem which employs adults with special needs. If you have a chance you should go check it out, their new center is beautiful! Anyways, Racheli happens to work with a bunch of my friends at Nefesh B'Nefesh so I gave her a bag of the hamantaschen so that they could all celebrate Pi Day and my birthday as well!

And as usual here are the links to the recipes:
Double Boiler Dulce De Leche
Caramel Apple Filling
Buttery Hamantaschen

Monday, March 13, 2017

Days 3 and 4 of Hamantaschenpalooza

After day 2 of my Hamantaschen bonanza I realized that I didn't really have a plan for which ones I wanted to make. I went over to good old Pinterest and lo and behold they had endless suggestions! After a quick check of my inventory I knew what to do. 

Day 3: Thin Mint Hamantaschen


Any Expat who lives in Israel can tell you that one of the most depressing times of the year is when all of your friends are getting their Girl Scout cookies in America, but alas said cookies never make it over here. Add that to the fact that most Israelis have an aversion to mint and chocolate and you realize that there really is no hope for Thin Mints ever becoming a thing here. So I had to take matters into my own hands and make Thin Mint Hamantaschen. 


It wasn't hard to find a recipe for these, seeing as Americans LOVE mint and chocolate together. It used to be quite difficult to find mint extract here, to the point that I would have to bring it in from America whenever I visited, but in the past few years I haven't had a problem finding it here. I asked the shop owner where I buy it why he started carrying it and he said that French Olim have asked for it quite often, so I guess I have the influx of French Aliya to thank for that. 


Anyways, back to the cookies. I had everything I needed so I made the dough. This is hands down the hardest dough I have ever worked with. I don't know what it was but somehow it was both dry and sticky at the same time. It would crack every time I rolled it out, yet it still stuck to the rolling pin. Maybe I should feel bad for all those poor little Girl Scouts slaving away to make thin mints. 


Big lump of difficult deliciousness
Either way I managed to make a few trays of it before I gave up and threw the remaining dough in the trash. 


I know it looks all easy and manageable from this pic but it's a LIE
Perhaps its only redeeming quality is the fact that it was DELICIOUS. Really tasted like thin mints and the cookie had the same texture as well. Unfortunately my students didn't share my enthusiasm and in true Israeli form turned their noses up at the thought of mint and chocolate. Oh well, just meant more for my friends!

Here's a link to the recipe: Midnight Mint Hamantaschen

Day 4: Homemade Strawberry Jam


Right now we are at the peak of strawberry season here in Israel. Berries in general are hard to come by here. I can't remember the last time I had a fresh blackberry, but strawberry season brings with it an abundance of sweet, juicy strawberries and dropping prices. This week I found myself at the supermarket looking at a mountain of strawberries for a great price so I jumped on it. 


Cute strawberry strainer courtesy of my friend Leora
I've been wanting to try my hand at making jam for a while so I figured this was the perfect opportunity. One small snag, couldn't find pectin. While Israel has come a long way when it comes to hard to find ingredients, it certainly still has a long way to go. I'm sure pectin exists somewhere in this country, but I didn't have the time last week to go on a quest. Luckily jam hasn't always been made with pectin so I found myself a recipe that left it out. This recipe uses only three ingredients: fresh strawberries, sugar, and lemon juice. The jam I made is not so much a jam as a thick sauce, though once baked in the hamantaschen it firms up a bit more. Its runniness led to some trouble when it came to shaping the hamantaschen so in the end I had to form the empty hamantaschen and then drip the "jam" into them.


Please keep the untoward comments to yourself...
Of course it wouldn't be a true hamantaschen baking experience if some of them didn't pop open. I used the same dough I used for the cookie butter hamantaschen because it's easy to work with and delicious. 


I am now left with an abundance of runny jam. Please comment with ideas for what else I can use it for. Seeing as I don't yet have any canning supplies I need to use it up quick. 

Here's a link to the jam recipe: Old Fashioned Strawberry Jam

I know that Purim has come and gone by now but stay tuned for the last 3 hamantaschen!!!

Monday, March 6, 2017

Take Two

Like any good new years resolution I instantly failed at mine. Hehe. But just because I failed once doesn't mean it can't be done so here I am giving it another try. In just under a week we will celebrate my favorite holiday, Purim. Now I'm partial to Purim because it happens to also be my birthday as well as the day I decided to become religious almost eleven years ago (WOW). This year is especially exciting as it is also my 30th birthday! Man am I old. 

As many of you know, us Jews love food and any true Jewish holiday is centered around copious amounts of it, and Purim is no exception. Not only do we give each other gifts of food (mishloach manot), have a giant meal together (seudah), and drink until we drop, we also celebrate the holiday with a lovely cookie called a Hamantaschen (cue the multiple spellings of any Yiddish word). It is triangular, like the hat of the holiday's villain Haman, and stuffed with some kind of filling.

The Hamantaschen is a wonderful cookie because it is so versatile. You can make the traditional poppy seed, which frankly I've never understood the appeal of, or you can change it up. Different doughs, different fillings, even savory, the combinations are endless. So this holiday season I have, for whatever reason, taken it upon myself to make seven different hamantaschen for each day during the week before Purim. I don't think I'll have time to post every day so I'll put a few into each post. 

Day 1: Cookie Butter Hamantaschen (IT'S MADE OF COOKIES!!!!!)

Last year I made hamantaschen for my ESL students and to this day they still talk about them! I made a few different types last year but the cookie butter filled hamantaschen were their favorite so I figured it's a good place to start this year!


I remember having a great pareve dough recipe last year but of course I didn't save it anywhere and had no idea where to start looking for it this year. In the end I used Tory Avey's pareve hamantaschen dough recipe. This recipe uses oil, not margarine, which is a huge plus. Not only is it healthier, to some extent, but I also didn't have to wait for anything to soften or pull out my Kitchenaid to make it. The dough comes together easily and doesn't need to be refrigerated. Also, because it's a pretty neutral flavor, you can add basically any filling. I filled mine with about half a teaspoon of cookie butter. It's important to really make sure the sides are smushed together so that they don't pop open while baking. I baked mine for around 12 minutes, even though the recipe calls for 20-25, and they came out chewy with crispy corners.

Here's the recipe I used for the dough: Dairy Free Hamantaschen Dough


Day 2: Funfetti Cheesecake Hamantaschen with Chocolate Drizzle


So I didn't really plan my cookies. I decided on the first day that I was making seven different hamantaschen but I only really had plans for one. This led to me frantically searching for a recipe that I had the ingredients to at 9:15 PM when I got home from tutoring. Apparently I had stocked up on blocks of Philadelphia cream cheese a few weeks ago so I decided to go the cheesecake route. I found a recipe for Funfetti Cheesecake Hamantaschen that looked good, only problem was I didn't have rainbow sprinkles, only chocolate. Can it still be called funfetti if it doesn't look like it came out of a unicorn's butt? Either way the chocolate sprinkles did the trick. 


The dough recipe for these cookies is also an oil recipe, which I felt was a bit of a shame as I was making a dairy filling so I could also make a dairy dough, but it was late and I wasn't about to go searching for another recipes and I definitely wasn't willing to wait for butter to soften seeing as I don't have a microwave. As an English teacher the previous run-on sentence is making me cringe.


I also baked these for about 12 minutes. After baking I felt they needed a little something extra so I melted some Hershey's Mini Kiss chocolate chips and drizzled it on top. 


Here's the recipe I used: Funfetti Cheesecake Hamantaschen

Monday, January 2, 2017

New Years Resolutions

Hey. Most of you don't know that many a year ago I dabbled, and when I say dabbled I really mean lazily attempted, a baking blog. I never really got into it and it didn't last very long. Of course, true to its nature, the internet has immortalized it, as you can see below. I haven't looked at it, let alone thought about it, for a few years now. It's interesting to read my old posts, so much has changed. I no longer teach at a school for children with Autism, I recently bought my first apartment, and my baking has gotten SO MUCH BETTER. Hopefully by posting my writing will improve as well, as we all know "Writing improves writing". As with many resolutions I may not always want to do it, I may not always do it as much as I want to, and it may not be as good or inspired as I hoped it would be but if you don't try you will never know. So bear with me as I resurrect ye olde blogg.

Thursday, May 17, 2012

The Prodigal Daughter Returns, and Alcoholic Cupcakes

The Prodigal Daughter Returns, and Alcoholic Cupcakes

And I'm back. What? It wasn't really that long, atleast it didn't feel like it was that long. This year has been C-R-A-Z-Y! New job, "finishing" my degree, got a car. I don't think that I have ever been so busy in my life. Okay, maybe in Sherut Leumi I was busier, but back then I had much fewer responsibilities so I guess I didn't feel the pressure. That's not to say I didn't bake, I most certainly have been baking this whole time, and taking pictures, and posting those pictures to Facebook, just not fulfilling my blogbilities. Sorry. But now, with the end of the school year looming close, I suddenly have managed to balance everything and find some time for myself, which I will attempt to fill with this blog.

So, without further ado, I present to you:

Chocolate Red Wine Cupcakes with Red Wine Buttercream


This week one of my room mates threw a party to celebrate her health. It's been a year since she overcame an illness and in true Jewish style she decided that it is only proper to celebrate it with wine and food. These cupcakes have a lot of meaning behind them both for me and for my room mate. For me, finding this recipe and making these cupcakes has made me fall in love with baking all over again and given me the push I needed to restart this blog. For my room mate they both the process and taste of the cupcakes perfectly describe her, not to say her obsession with chocolate and wine. She is one of those people who really tries to do all she can for others. When I burned the red wine syrup the first time and realized that between work and the gym I wouldn't have time to make it again before the party, without hesitation she said she would make it. Whether it be staffing Birthright trips or just washing the dishes, she really tries to help wherever she can. The frosting is also a good representation of her, sweet and delicious with a kick, and she certainly has a kick. Though I only met her this year, we became fast friends and I'm sure we will remain so.


In order to not anger my trainer I only had half a cupcake but it was sooooo good. I'm just going to give a link for the recipe because she explains it better than I could. Don't freak out, like I did, when the cupcakes collapse after being taken out of the oven, that's supposed to happen. Enjoy! Chocolate Red Wine Cupcakes with Red Wine Buttercream

For some reason it won't upload all of my pictures so I'll try again later. ;-)

Friday, September 2, 2011

My First Teacher Orientation!!!


I'm here, I made it, I finally have my own class of awesome, amazing, inspiring 3rd grade kids with autism. I couldn't be more excited. This is the whole reason I even started a degree in special education, sat through all of the classes about all of the other disorders, syndromes, and learning disabilities, all so that I could eventually have my very own class of cuties!!! This past year was the first time in four years that I hadn't worked with autistic kids and the whole year I felt like something was missing, and now I've found it.
This past week we had teacher orientation. All of the new staff introduced themselves and something interesting about themselves not connected to education and guess what I talked about! The blog, of course, which was perfect because I had brought some cookies along with me. Super yummy, chock-full-o-goodness, crispy yet chewy cookies. 


They're called Rocky Road cookies, and correct me if I'm mistaken but I remember rocky road including marshmallows. Well this recipe does have almonds and white chocolate chips inside of a yummy chocolate cookie, but no marshmallows.

I ran into one big, gigantic problem on the way. Whilst cleaning the oven in my new apartment I got a bit overzealous and decided "Why not use oven cleaner on the nasty, greasy outside of the oven as well?" I'll tell you why not, because it rubs any numbers, dots, little oven pictures off of the dials and then you can't tell what temperature or mode the oven is on. Uh oh.

Can I tell you something awesome about living with room mates? Two heads, or in our case four heads, are better than one. One of my room mates figured out that if you looked at the dial from the side while the light in the kitchen was on you could see where the dots and numbers once were, and thus I found myself marking off the increments with a white-out pen. 

I feel like MacGyver

So now with my oven dial repaired, kitchen stuff moved in, and first day jitters, I was ready to bake. And I'll give you the recipe so you can as well.


Rocky Road Cookies
Taken from The Pastry Affair


1/2 cup butter, room temperature
3/4 cup white sugar
1 large egg
1tsp vanilla extract
3/4 cup AP flour
1/3 cup cocoa powder
1/4 tsp baking soda
Pinch of salt (this measurement always confuses me, what if you have gigantic hands? Or tiny hands?)
2/3 cup white chocolate chips (like always I added more)
3/4 cup sliced almonds (added more here as well, silly me)

Preheat your oven to 175C. Hopefully you haven't rubbed off the numbers so you won't have any trouble with this step.
Cream together the butter and sugar until light and fluffy. Add the egg and vanilla and beat until well combined.
In a separate bowl mix the flour, cocoa powder, baking soda, and salt. Slowly add this mixture to the wet mixture and beat until well mixed. Stir in the white chocolate chips and almonds. I think that marshmallows would be a great addition as well.
Spoon onto a baking sheet and flatten slightly with your hand. Bake for 8-10 minutes before moving to a cooling rack to cool completely. Store in airtight container at room temperature.
Enjoy!